夜晚/我爱天空点点明星/白天/我爱天空飘飘白云;
无论什么夜晚/天空总会出现了星;
无论什么白天/天空总会漂浮着云。
星不怕黑暗/云不怕天阴;
点点的星/能扩大了人生/片片的云/能象征着自由。
以上为定场诗
警告
您需遵守所在组织及国家/地区的管理制度以及法律法规,不适当的操作可能会承担民事责任甚至刑事责任,任何损失与本文作者无关,不同意的请立刻按Ctrl+W或者Cmd+W
简介
大家好,曾几何时我们对Slack的印象就是一个大型多人同性交友聊天软件。前天他们开源了他们自己在用的nebula 软件。我就趁着热乎劲,赶紧安装一番跟大家报告一下。
阅读本文需要您了解基本的网络概念,并掌握基本的shell操作。
设想当您在不同的地方运行计算机时,如何将它们互相连接起来呢?或者到家之后想访问自己放在办公室的计算机?一直以来我们使用VPN来做这件事情,使用IPSec隧道技术将不同地点的计算机/路由器连接在一起,优点是安全,缺点是通信性能受损,而且所有的包都要通过专门的IPSec服务器转发;也有人用反向代理,frp或者花生壳之类的,痛点明显。
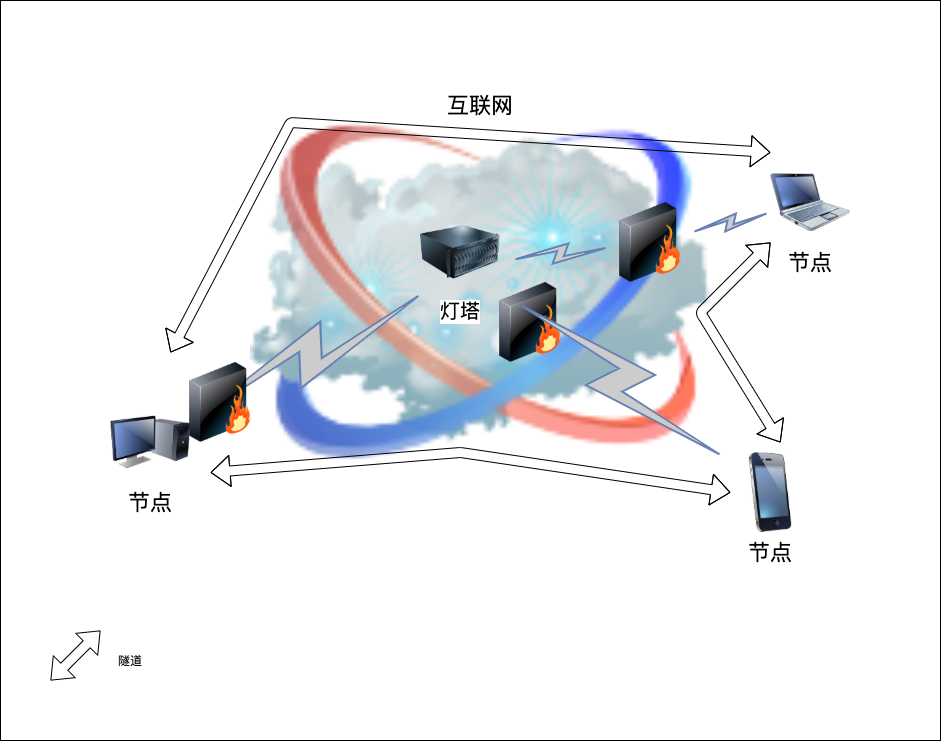
据Slack自己说,nebula在性能、功能、安全、易用等方面超越了各种解决方案。他们提出了类似p2p的思路,加入nebula网络的各节点直接通信。
其中有一个且仅有一个节点叫做“灯塔”,其他都是普通节点。“灯塔”负责各节点的认证,收集更新节点信息并发送给各节点但并不参与数据传送。目前支持Linux、Windows、MacOS,以及将要暗搓搓滴支持IOS
安装
实验环境介绍
本文用到的材料:
灯塔
第一个先安装“灯塔”,这需要一个公网能访问的UDP4242端口(端口号可以自定义)。
先准备环境,用WML三家任意哪一个工作站都行,我就在“灯塔”上运行了。
拿到运行文件
1
2
wget https://github.com/slackhq/nebula/releases/download/v1.0.0/nebula-linux-amd64.tar.gz
tar -zxvf nebula-linux-amd64.tar.gz
注:可能需要赋予可执行权限,比如 chmod +x nebula
给自己建一个CA,这个命令将生成ca.crt与ca.key,后者一定要偷偷藏起来。
1
./nebula-cert ca -name "beijing2b"
为各节点签发证书,分别为lighthouse、buf、win10
1
2
3
./nebula-cert sign -name "lighthouse" -ip "192.168.250.1/24"
./nebula-cert sign -name "win10" -ip "192.168.250.3/24"
./nebula-cert sign -name "buf" -ip "192.168.250.100/24"
将文件复制到一个看起来很专业的地方
1
2
3
mkdir /etc/nebula
cp ca.crt /etc/nebula
cp lighthouse.* /etc/nebula/
然后生成一个配置文件,比如:
1
nano /etc/nebula/lighthouse-config.yaml
内容大概是
 1
 2
 3
 4
 5
 6
 7
 8
 9
10
11
12
13
14
15
16
17
18
19
20
21
22
23
24
25
26
27
28
29
30
31
32
33
34
35
36
37
38
39
40
41
42
43
44
45
46
47
48
49
50
51
52
53
54
55
56
pki :
ca : /etc/nebula/ca.crt
cert : /etc/nebula/lighthouse.crt
key : /etc/nebula/lighthouse.key
static_host_map :
"192.168.250.1": [ "lighthouse.beijing2b.com:4242" ]
lighthouse :
am_lighthouse : true #这行只有“灯塔”才有
interval : 60
# 以下两行一定要注释掉
#hosts:
# - "192.168.250.1"
listen :
host : 0.0.0.0
port : 4242
punchy : true
tun :
# 网卡名字
dev : nbl
drop_local_broadcast : false
drop_multicast : false
tx_queue : 500
mtu : 1300
routes :
#- mtu: 8800
# route: 10.0.0.0/16 #这里可以分发路由表,一行聚合不了的可以写多行,下面的覆盖上面的
logging :
level : info
format : text
firewall :
conntrack :
tcp_timeout : 120h
udp_timeout : 3m
default_timeout : 10m
max_connections : 100000
outbound :
# 放开所有出站
- port : any
proto : any
host : any
inbound :
# 放开各节点所有流量,这里可以有不同的粒度,甚至有类似云主机那种安全组的概念
- port : any
proto : any
host : any
然后运行下试试
1
./nebula -config /etc/nebula/lighthouse-config.yaml
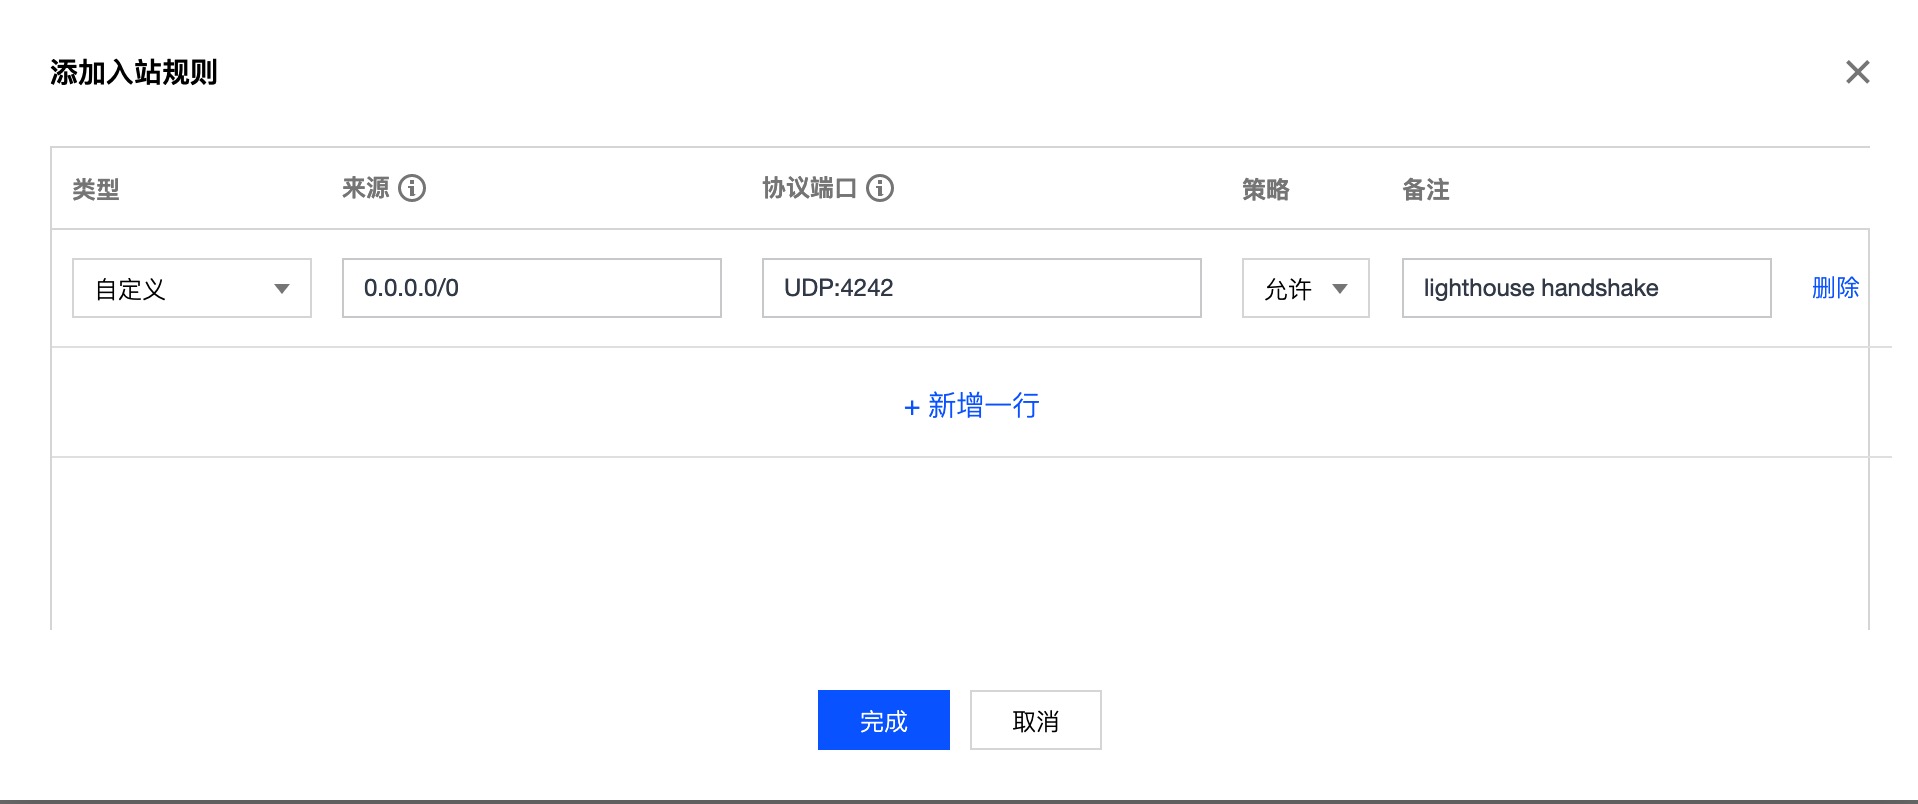
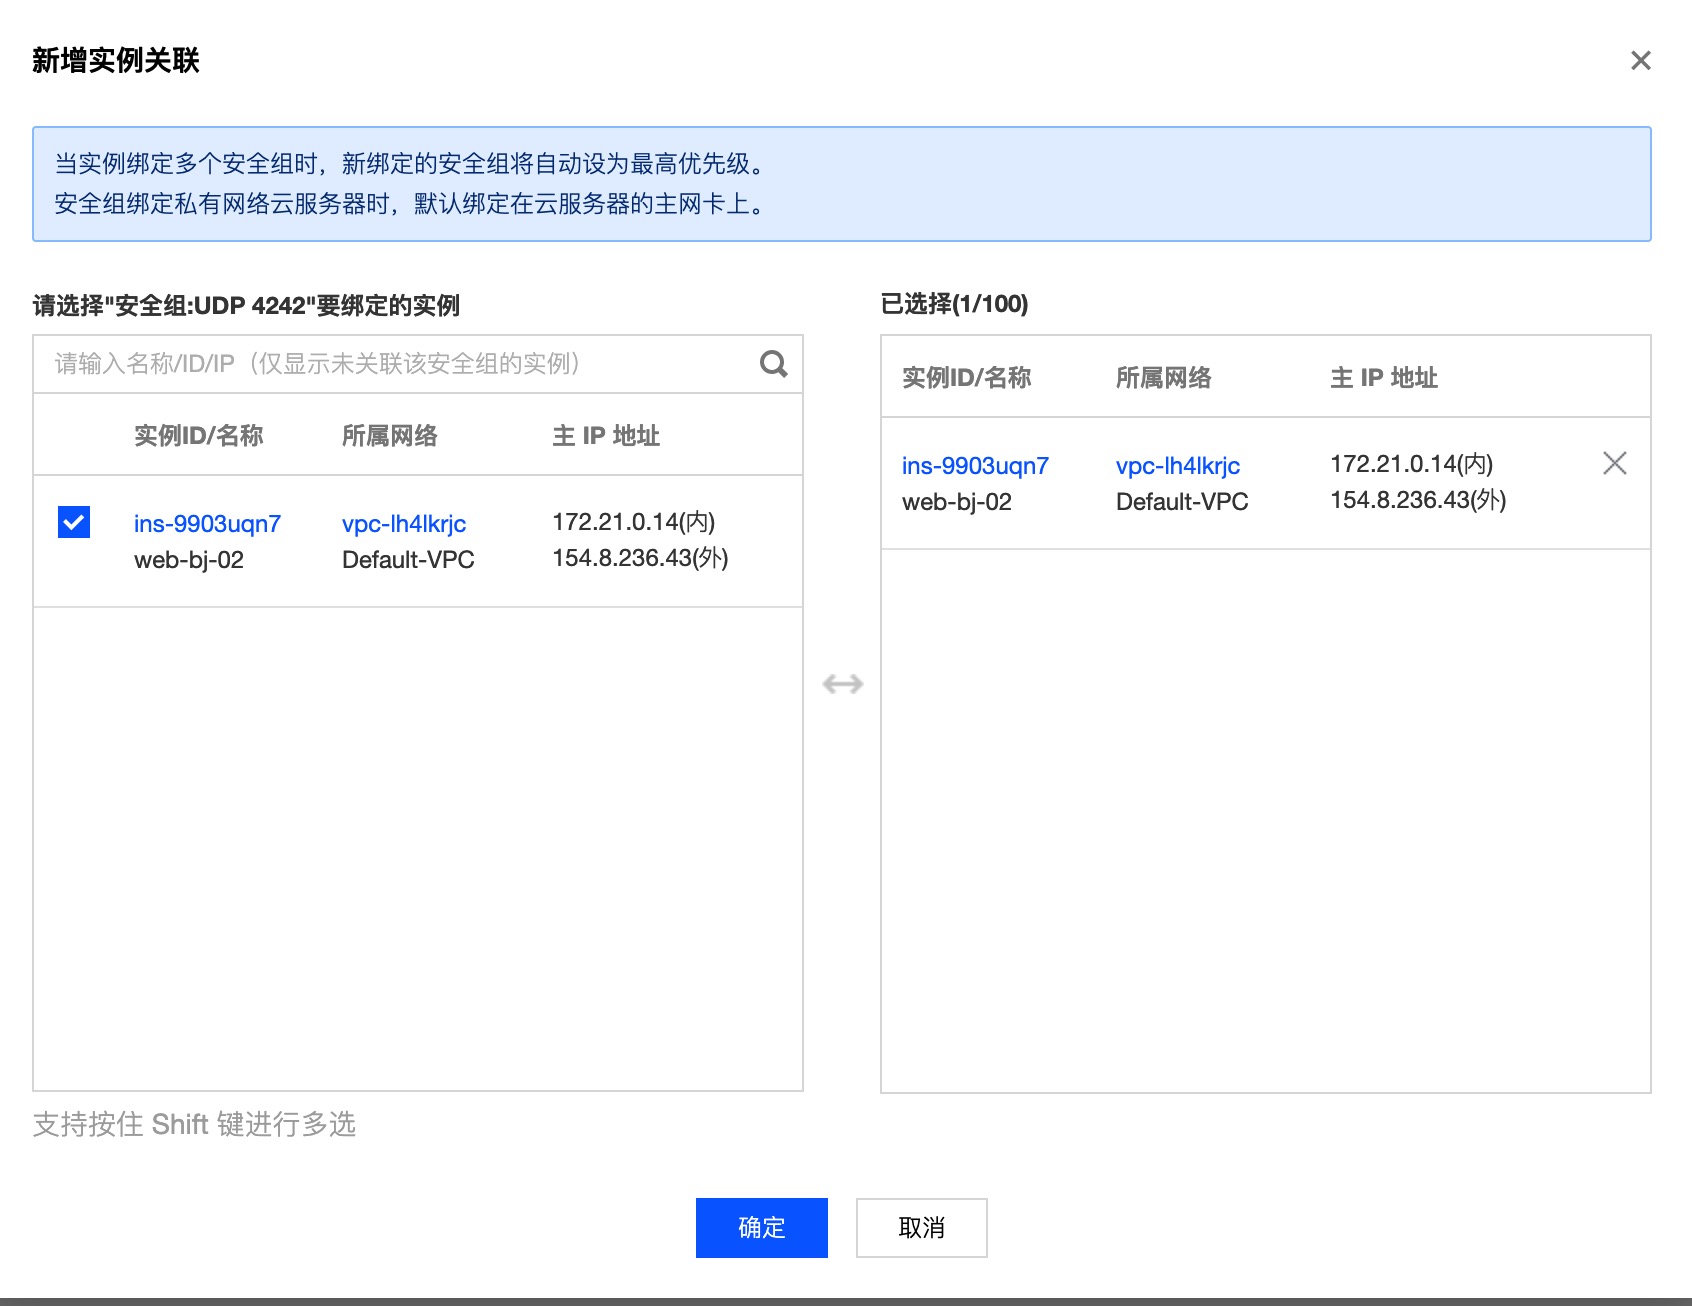
“灯塔”可能需要配置防火墙,放开UDP4242入站;VPS还需配置安全组。不同的厂家不一样,大概是这样:
用手边的计算机试试端口通不通:
 1
 2
 3
 4
 5
 6
 7
 8
 9
10
11
nc -vuz lighthouse.beijing2b.com 4242
found 0 associations
found 1 connections:
1: flags = 82<CONNECTED,PREFERRED>
outif ( null)
src 192.168.1.7 port 57647
dst 154.8.236.43 port 4242
rank info not available
Connection to lighthouse.beijing2b.com port 4242 [ udp/*] succeeded!
win10 节点
获取软件包
https://github.com/slackhq/nebula/releases/download/v1.0.0/nebula-windows-amd64.tar.gz
安装TAP驱动
去OpenVPN官网 下载驱动并安装
配置
然后编辑一个 win10-config.yaml并且把之前准备好的 ca.crt、win10.crt和win10.key复制过来,记住不要 把ca.key也复制过来。
内容大概是:
 1
 2
 3
 4
 5
 6
 7
 8
 9
10
11
12
13
14
15
16
17
18
19
20
21
22
23
24
25
26
27
28
29
30
31
32
33
34
35
36
37
38
39
40
41
42
43
44
45
46
47
48
49
50
51
52
53
54
55
pki :
ca : c:\nebula\ca.crt
cert : c:\nebula\win10.crt
key : c:\nebula\win10.key
static_host_map :
"192.168.250.1": [ "lighthouse.beijing2b.com:4242" ]
lighthouse :
am_lighthouse : false
interval : 60
# 以下两行一定不要注释掉
hosts :
- "192.168.250.1"
# 这一节无所谓,有木有都不要紧
listen :
host : 0.0.0.0
port : 4242
punchy : true
tun :
# 网卡名字这个对于Windows木有用
dev : nbl
drop_local_broadcast : false
drop_multicast : false
tx_queue : 500
mtu : 1300
routes :
#- mtu: 8800
# route: 10.0.0.0/16
logging :
level : info
format : text
firewall :
conntrack :
tcp_timeout : 120h
udp_timeout : 3m
default_timeout : 10m
max_connections : 100000
outbound :
# 放开所有出站
- port : any
proto : any
host : any
inbound :
# 放开各节点所有流量。
- port : any
proto : any
host : any
使用
用管理员运行
1
2
3
.\ nebula . exe -config c: \ nebula \ win10-config . yaml
time = "2019-11-22T11:13:34+08:00" level = info msg = "Handshake message sent" handshake = "map[stage:1 style:ix_psk0]" initiatorIndex = 701009003 remoteIndex = 0 udpAddr = "154.8.236.43:4242" vpnIp = 192.168 . 250 . 1
time = "2019-11-22T11:13:34+08:00" level = info msg = "Handshake message received" durationNs = 345766400 handshake = "map[stage:2 style:ix_psk0]" initiatorIndex = 701009003 remoteIndex = 701009003 responderIndex = 4122392781 udpAddr = "154.8.236.43:4242" vpnIp = 192.168 . 250 . 1
Buf节点
与“灯塔”安装获取软件包相同。
然后复制ca.crt、buf.crt和buf.key过来并编辑buf-config.yaml
与win10-config.yaml不同之处主要在于:
1
2
3
4
pki :
ca : /etc/nebula/ca.crt
cert : /etc/nebula/buf.crt
key : /etc/nebula/buf.key
然后就可以运行了
1
./nebula -config /etc/nebula/buf-config.yaml
至此,一个三节点的网络就连好了。其实他还支持分组什么的,对于大型网络也不错。
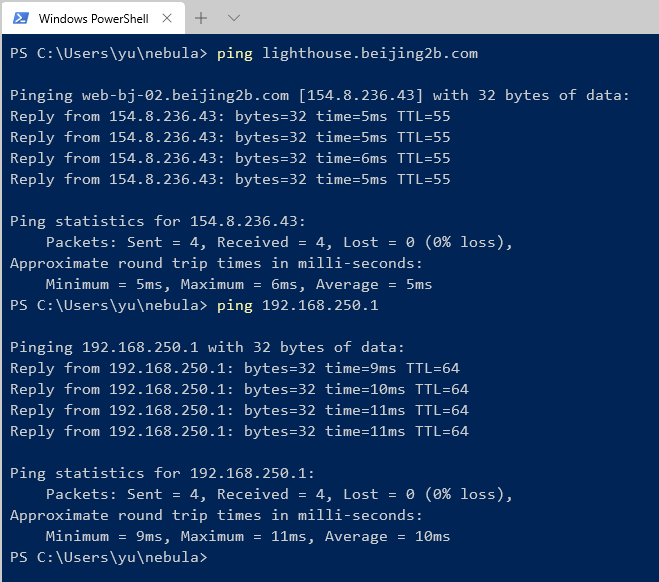
目前试用中发现nebula的ping值开销有点大,下图是对同一个计算机ping的不同结果:
总结
优点:
缺点:
还缺少移动端的支持
性能开销明显(也许是我不会弄,或者还可以优化)
新兴事物,第三方整合还不存在
总之呢,这玩意既然把网连上了,怎么玩就看各位想象力了。
感谢观看,本文完。
不要点开这里,点开后果自负
1
2
3
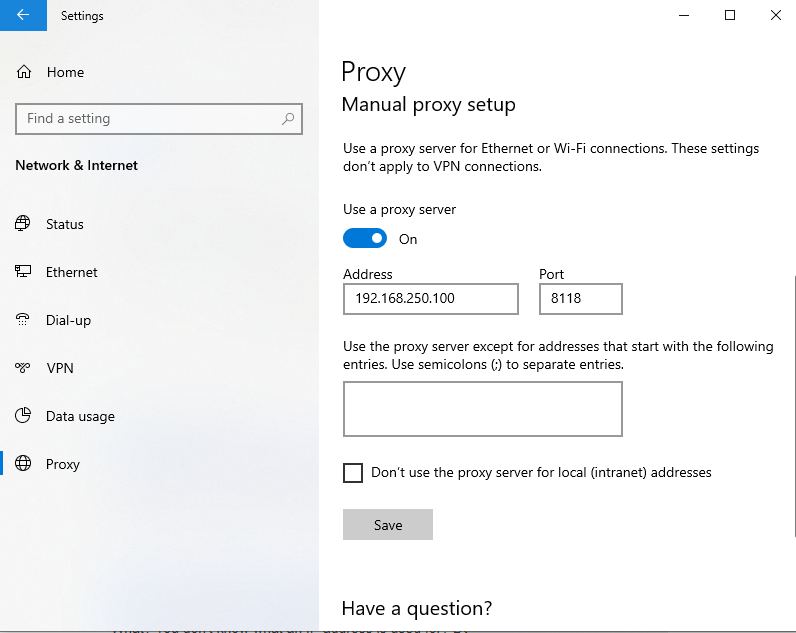
apt-get install privoxy -y

nano /etc/privoxy/config
1
listen-address 192.168.250.100:8118
1
systemctl restart privoxy

